How to Change a Charging Circuit on a Yanmar L48N Engine
In this video, we show you how to change a charging circuit on a Yanmar L48N Engine.
Health & Safety Warning - Please ensure that you have safely prepared the machine and workspace. If you are unsure about any aspect of the task please seek professional advice.
Transcript
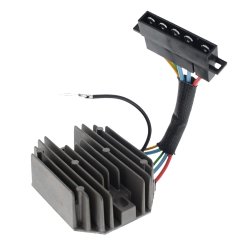
Today we're going to change the charging circuit on the L48N Yanmar Engine. To make this easier we will need to remove the exhaust and the starter motor. Using a 10mm spanner, remove the two 10mm bolts which sit on the underside of the exhaust. Once these have been removed, using a 12mm spanner unscrew the two 12mm bolts on the side of the exhaust port. You will now be able to detach the exhaust from the engine. Now using a 14mm spanner, you need to loosen the two 14mm bolts which fix the starter motor to the engine. There are two wires attached to the starter motor which you need to remove. The wire below the nut can be pulled loose. Then with a 13mm spanner unscrew the 13mm nut which secures the wire to the motor, then detach it. For safe keeping you can handscrew the nut back onto the motor. Now the wires are detached, you can safely continue to unscrew the two 14mm bolts completely freeing the starter motor. Please be careful whem working with electric. Using a 10mm Spanner remove the two 10mm bolts which hold the base of the charging circuit onto the machine. You can then pull the red and white cable holder from the machine. Now remove the plate behind the base by unscrewing the two 10mm bolts. Then disconnect the wires which connect the plate to the machine by carefully pulling them away. This will completely free the circuit. Check the circuit for any wear or damage to the wires. If they are damaged it may cause them not to work. This could cause the engine not to work efficiently. Whilst you're checking that, you can also check the fuse which is located in the white box. Replace the charging circuit if necessary. Now place the exhaust back into to position, making sure it is seated correctly. Whilst holding in position, use a 12mm spanner to screw in the two 12mm bolts at the side of the exhaust. Once these are in place you can use a 10mm spanner to fix in the two bolts underneath the exhaust. Then return to tighten the two bolts at the side of the exahust. To fit the charging circuit it you need to connect the two wires to the circuit with connectors, carefully push them on to the two green wires that are loose on the machine. Once that's done you now need to fix the bracket back on with the 10mm spanner, and secure with two 10mm bolts. Now you can fix the charging circuit onto the bracket with the two 10mm bolts, making sure it's secure. When those components are in place, place the starter motor into position. Using a 14mm spanner, screw in the 14mm screw at the top of the starter motor. You can then return and fix the 14mm screw which sits beneath the motor. Then re-attach both wires leading from the charging circuit to the starter motor. To secure the wire that uses a 13mm nut, make sure that it is tight and seated correctly. That's how you change a charging circuit on a Yanmar L48N.
Parts
Parts and tools included in the L48N Engine how-to video.
- Reg. & Harness Assembly - 114399 77550
- Genuine 12v Starter Motor - 114362 77011
- Muffler Assembly 114288 13500