How to Change the Clutch on a Stihl TS420 Disc Cutter
In this video, we show you how to change the clutch on a Stihl TS420 disc cutter.
Health & Safety Warning - Please ensure that you have safely prepared the machine and workspace. If you are unsure about any aspect of the task please seek professional advice.
Transcript
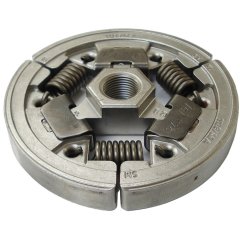
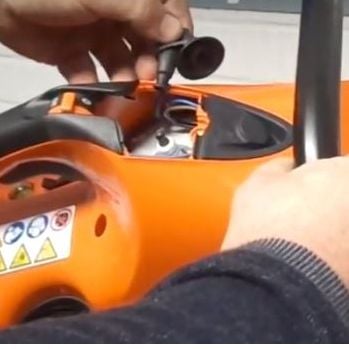
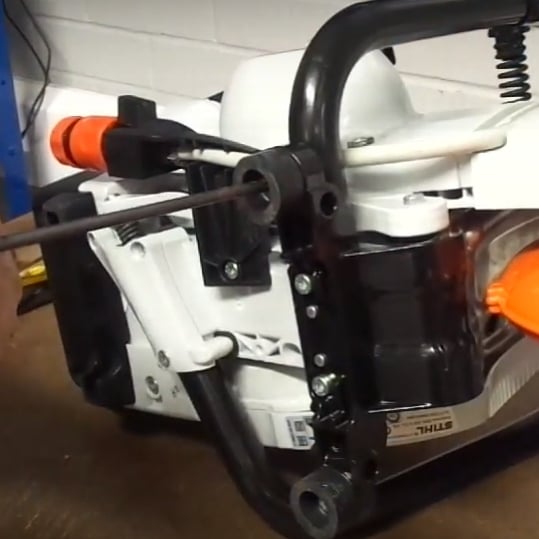
Today, we're going to change the Clutch on a Stihl TS420 cut off saw. First of all, use a torx spanner to remove the screw that secures the water connector from the underside of the machine. This will provide better access to the recoil. Next, use a 19mm Hex Socket Spanner, turning it anti-clockwise to loosen the tension of the belt. Once this is done, use a 13mm Hex Socket Spanner to loosen the three nuts that secure the recoil assembly. Then revisit each nut and completely remove them, freeing the recoil from the machine. Using the torx spanner, remove the screw that secures the nose guard to the arm. Once the nose guard is off, use the 19mm Hex Socket Spanner, turning it anti-clockwise to further loosen the tension of the belt. Completely remove the front of the saw to free the belt. You will then need to remove the cover of the machine and the spark plug and screw in the piston stop, this will lock the crank so you can remove the clutch. Using the 13mm Socket spanner, undo and remove the nut that secures the clutch, and remove the starter cup by sliding it off. Then use the 13mm Socket spanner, turning it clockwise to loosen the clutch and unwind it off. You can then take off the spacer and remove the clutch pulley assembly and inspect the bearing for any signs of wear. If you are simply checking the clutch and don't plan to replace it, make sure you check that the springs don't have cracks or are worn out. Also check the clutch shoes for wear. Place the clutch pulley assembly and spacer back into position. The clutch has a left hand thread, so turn it anti-clockwise along the thread, then secure it in place using the 13mm Hex Socket Spanner. Relocate the starter cup, make a note of the mould ensuring you fit it correctly. Then screw the nut back into place and tighten with the 13mm socket spanner. Unscrew & remove the piston stop that was fixed in the top of the machine. Hand screw the spark plug in, being careful not to damage the thread, then tighten it with the 19mm Hex Socket Spanner. Locate the cap back on top of the spark plug. Then place the cover back over it, and screw it back on using the torx spanner. To fit the belt, locate it over the clutch, making sure that it is sitting in the grooves correctly, to prevent damage to the belt. Then feed the belt back through the arm, relocating the arm back in position around the studs. Feed the belt back around the pulley. Slowly turning the pulley will help you easily locate the belt. Make sure the blade turns with a smooth motion. Relocate the nose guard onto the arm and use the torx spanner to fix this in place. Make sure the screw is secure without overtightening it, as the casing is only plastic. Locate the recoil assembly onto the machine, loosely turn each nut a few times. Then return to tighten each nut with the 13mm spanner, again, be careful not to split the plastic when tightening. Then re-tension of the belt using the 19mm Hex Socket Spanner. Don't forget to fix the water connector back into place under the machine using the torx spanner. That's how you change the Clutch on the Stihl TS420. All the parts & tools needed for this task are listed in the description below.
Parts
Parts and tools included in the TS420 disc cutter how-to video.
- Genuine Clutch - 4238 160 2002
- Non-Genuine Clutch - 400 219
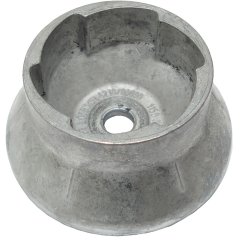
- Starter Cup - 4238 195 0600
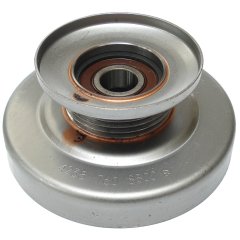
- Clutch Pulley Assembly - 4238 760 8500
- Clutch Spring - 0000 997 5815
- Spline Screw M5 x 20 - 9022 371 1020
- Clutch Pulley Bearing - 9503 003 5136
- Clutch Pulley Assembly - 4238 760 8500
- Clutch Shoe - 1128 162 0806
- Clutch Shoe Retainer - 1128 162 3000
- Genuine Torx Wrench/Plug Spanner - 4224 890 3400
- Non Genuine Torx Wrench/Plug Spanner - 410 250